
- Icebox Watermelon Growing Guide: How To Grow It In Your Garden - August 21, 2021
- Duke Blueberry Growing Guide: How To Start Your Blueberry Garden? - August 21, 2021
- Pink Hibiscus Growing Guide: How To Grow One Easily? - August 16, 2021
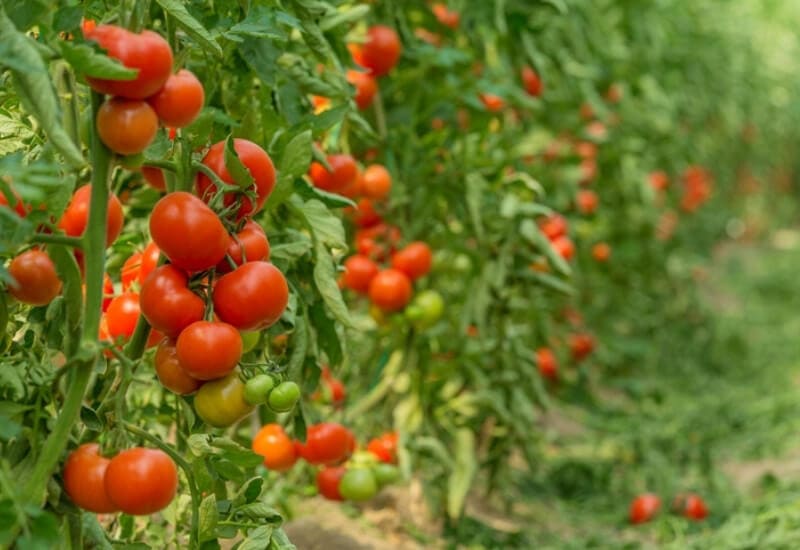
They’re the prize of every summertime gardener: Ripe, juicy tomatoes hanging beautifully on the vine. When the last threat of frost has finally passed and it’s time to till up the ground, most people start dreaming about their favorite varieties.
While some prefer German Johnsons, Better Boys, or Early Girls, others always reach for their tried-and-true Beefmasters. So named because they’re one of the most popular kinds of beefsteak tomatoes, Beefmasters are easy to grow and ideal for beginners.
Not so sure your thumb is green enough to turn them red? Today, we’re sharing the ultimate Beefmaster Tomato Growing Guide to help you learn everything you need to know before you get started!
What Are Beefmaster Tomatoes?
While there are only around 13 species of wild tomato plants, there are hundreds of different hybrid varieties. The latter is far more prevalent and chances are, the tomatoes you ate on your last salad or sandwich were hybrids
This includes Beefmaster tomatoes, which are more technically called Lycopersicon esculentum var. Beefmaster. These tomatoes are classified as indeterminate tomatoes or vining tomatoes. This means they grow on long vines and require staking to keep the fruit off the ground. They’re well-known for their mild, sweet taste and each one grows to around two pounds.
If you’re successful at growing a crop of Beefmasters, you’ll be rewarded with substantial, meaty tomatoes. These plants are especially fertile and grow well in soil that’s appropriately suited to their needs. They’re also great at keeping certain illnesses and diseases away, including verticillium and fusarium wilt, as well as root-knot nematodes.
If you’ve ever lamented a tomato that was perfect with the exception of a solid crack all the way across its perimeter, then you’ll rejoice that Beefmasters aren’t as prone to splitting or cracking as some other varieties. This means they’re perfect for snacking, slicing, and adding to your favorite sandwiches!
Understanding Beefmaster F1 Hybrids
What purpose do hybrids serve? Usually, they’re formed when researchers want to create a model of something that contains certain, selected traits.
Beefmasters are a specific type of hybrid tomato plant. They were initially bred in an attempt to create large, meaty tomatoes that would also be more disease-resistant than other varieties. Specifically, those in the know categorize them as F1 hybrids or first-generation hybrids.
In botany, an F1 hybrid is any plant species that is cross-bred or cross-pollinated from two other pure species. The parent types must be distinctly different for this process to work as intended. In the case of the Beefmaster, this tomato was bred from two different varieties of “pure” tomatoes that were not cross-bred themselves in any capacity.
Gardeners tend to prefer F1 hybrid tomatoes because, in concept, the first generation of any plant should be large and vigorous. Beefmasters tend to deliver on this expectation, showing off beautiful fruit and substantial yields in their first year. However, they often peak early and can fail to live up to their initial glory.
If you prefer to save the seeds from one garden to plant in the next, you may find that the fruit on your Beefmasters undergoes quite the transformation from Year 1 to Year 2. In most cases, it won’t be nearly as vibrant or plentiful and sometimes, it won’t be there at all. As they’re a hybrid, some second-generation plants produce completely sterile seeds.
A Step-by-Step Beefmaster Tomato Growing Guide
Have we convinced you that it’s time to grow a few Beefmasters in your next garden? If so, it’s important to approach this task with care and caution. Here are a few tips to help you get the most out of your crop and make it a bumper one!
Step 1: Prepare Your Seedlings
You can find starter Beefmaster plants in most nurseries. However, it’s easy and economical to grow your own from seed! You can usually buy more than a dozen seeds for the price you would pay to purchase just one starter plant.
If you go this route, then start your seedlings indoors about five to six weeks before the last frost date in your region. You can check your area on this helpful map to better understand when that date will occur.
Be sure to use high-quality potting soil to give them a fighting chance as soon as they start out. As the seedlings begin to mature, you can use an adjustable grow light to gradually increase the level of “sun” they receive each day. About three to four weeks after you first notice the plants begin to sprout, add a little tomato fertilizer to the soil.
If you go with plants from the nursery, then you just want to make sure that the threat of frost is over before you plant them in the ground. If your region stays cold almost all year round and you can’t exactly wait out the frost season, then you can place the plants in the ground a little earlier, but use a frost blanket to help them retain heat and stay as warm as possible.
Step 2: Choose a Garden Spot
Most gardeners start planning their garden plots in the early spring, even while frost still looms on the horizon. Wondering where to put your Beefmasters? Like most tomato varieties, Beefmasters love full sun. They require it to develop a productive yield, so it’s worth finding the right row.
Before you start tilling up the ground, take the time to look at your garden at different times of the day. Does it tend to get morning or evening shade? What about for a few hours in the afternoon? Pretend you already have planted out there, and check to make sure they’ll get plenty of light. Remember that if a tree looks barren in the early spring, it might be full of leaves by mid-summer and those could shroud your plants if you’re not careful.
Ideally, aim to find a space that will allow your fledgling tomato plants to absorb between six to eight hours of sunlight every day. As you look, remember that spacing matters. Prepare a garden spot big enough to space the plants about two feet apart.
Step 3: Enrich Your Soil

Depending on where you live, your garden soil might already be dark, rich, and full of nutrients. If it’s looking a little pale and sandy, though, you’ll likely need to give it a little boost before you start planting. Beefmasters are heavy feeders, and they require healthy soil to thrive.
A few loads of compost are usually all that’s needed to turn almost any garden plot into a place for plants to thrive. Not only does compost add much-needed nutrients into your soil, but it also breaks up the ground and adds more drainage for your Beefmasters. Tomato plants are especially prone to root rot, which can occur when their roots don’t have enough room to drain.
Want to get a little more specific? If you have the right tools, you can check the acidity of your garden soil. If possible, try to achieve a pH of 6.4 to 6.8. If you want to get your soil professionally tested, try to do so in the fall so you have plenty of time to make the recommended adjustments before the planting season begins.
Step 4: Gather Your Supplies
Your Beefmaster tomatoes won’t start immediately after you plant them in the ground, but it’s still smart to go ahead and prepare for their inevitable climb! Before you put them in the ground, go ahead and buy one solid tomato stake for each plant. If you prefer to plant them inside tall cages or stacking ladders, those will work well, too.
Keep in mind that some cages can be too narrow for the plants, so measure before you buy. A tomato planter is an attractive, functional alternative!
At full maturity, Beefmasters grow to be about eight to 10 feet tall. Look for stakes that are at least that tall, and remember to buy plenty of tie-ins so you can keep them well-supported as they get taller.
Ideally, opt for tie-ins made of Velcro. These are easy to reposition, gentle on the tomato stem, and reusable season after season. Plus, you can usually find them at a low price point!
Step 5: Harden Off Your Seedlings
If you fail to harden off your seedlings properly, then you could wind up wasting all of that hard work you spent growing the plants indoors. Hardening is simply the process of slowly introducing your plants to the outdoors so you don’t shock them by taking them outside and leaving them there all at once.
At first, start by taking your seedlings outside for just a short amount of time. Choose a partly shady spot that only gets sun for about two hours. When that time is up, bring the plants back inside.
On the second day, look for a spot that gets a little more sun. Leave the plants in that spot for around four hours. As the days go by, look for spots that are progressively shadier and leave your plants outside for long stretches of time. Once you build your way up to 24 hours, it’s time to plant the Beefmasters in your garden!
Step 6: Plant Your Beefmaster Tomatoes
When it’s time to actually put your plants in the ground, dig a hole that’s a little deeper than your seedling container. You want to give the roots plenty of space to spread out and establish the plant. As mentioned earlier, the plants should be spaced about two feet apart so they don’t choke one another out.
Once you plant each seedling, use your hands or a garden trowel to press the loose soil firmly around the base of the plant.
Step 7: Prune Your Plants
Like almost every other tomato variety, Beefmasters require special pruning to make sure they’re getting all of the nutrients they need. Specifically, it’s smart to look out for suckers. These are those small shoots, or leaves, that grow right where the branch of a tomato plant meets the stem.
While they might look harmless, suckers can do some damage. Left untouched, they’ll grow into much larger branches, which can turn into bushy, secondary tomato plants. While these plants may eventually grow fruit, it’s more likely that they’ll just remain on the parent plant, absorbing nutrients and taking them away from the developing baby Beefmasters.
You don’t have to be overzealous about it, but while you’re in the garden, take a look at your plants and try to remove any suckers that you see.
Step 8: Water Your Plants
Beyond that, the only other weekly task is to make sure the soil is adequately watered. Aim to keep the soil moist at all times to avoid a condition called blossom end rot.
Characterized by a dark brown, slimy half-circle on the end of the tomato fruit, blossom end rot is the bane of almost every gardener’s existence. While it might look like the work of a pest, it actually happens when there’s a calcium imbalance at work within the plant. It commonly occurs when your growing season starts wet but gradually becomes dryer as the fruit develops.
To keep it at bay, try to keep your moisture levels consistent from one day to the next. Water your Beefmaster plants deeply, allowing the water to reach down to the roots and establish the plants. You can also try adding a few crushed eggshells to your soil, as these are also surprisingly high in calcium!
Use your finger to check and see if the soil is dry before watering. When you do bring out the hose or watering can, remember to water the plant at the base. Exposing its leaves and stem to a ton of water can lead to rot and various other diseases.
Caring For Your Beefmaster Tomato Plants
One of the most important ways you can care for your Beefmaster plants is to remember to stake them. These are tall plants that produce heavy fruit. They simply can’t stand up tall and balance all of that weight. As such, these plants need a sturdy stake to lean against as they grow.
Beyond that, there are a few others ways you can periodically nourish your plants and encourage a healthy crop. Let’s take a look at a few of them.
Organic Mulch

Your Beefmasters need consistent moisture to grow. However, the hot summer sun can quickly zap any water that you put on your garden. You can avoid some of this moisture loss by watering early in the morning or later in the evening when the sun isn’t at its peak.
Another way to help your tomato plants retain moisture is to provide a thin layer of mulch around their base, leaving a two-inch border around the bottom of the plant. Organic, natural mulch like wood chips is preferable for a variety of reasons, such as:
- Suppresses weed growth, ensuring no other plants compete for moisture and nutrients
- Adds nutrients back into the soil through decomposition
- Reduces water evaporation in the soil
- Maintains a consistent soil temperature to avoid shock
Plant Fertilizer

It’s not necessary for every garden, but most growing spots benefit from the continuous, gradual addition of fertilizer. While compost is a great material to add to your soil, it does its hardest work during that initial growing period. However, once your plants begin to produce fruit, it’s time to add actual fertilizer.
At the store, look for one that’s safe to use on produce and you should be set. You can choose to fertilize weekly or every two weeks, depending on your schedule. The only rule of caution is to avoid the stem. Fertilizing the stem of a Beefmaster tomato plant can cause it to burn.
Harvesting Your Crop
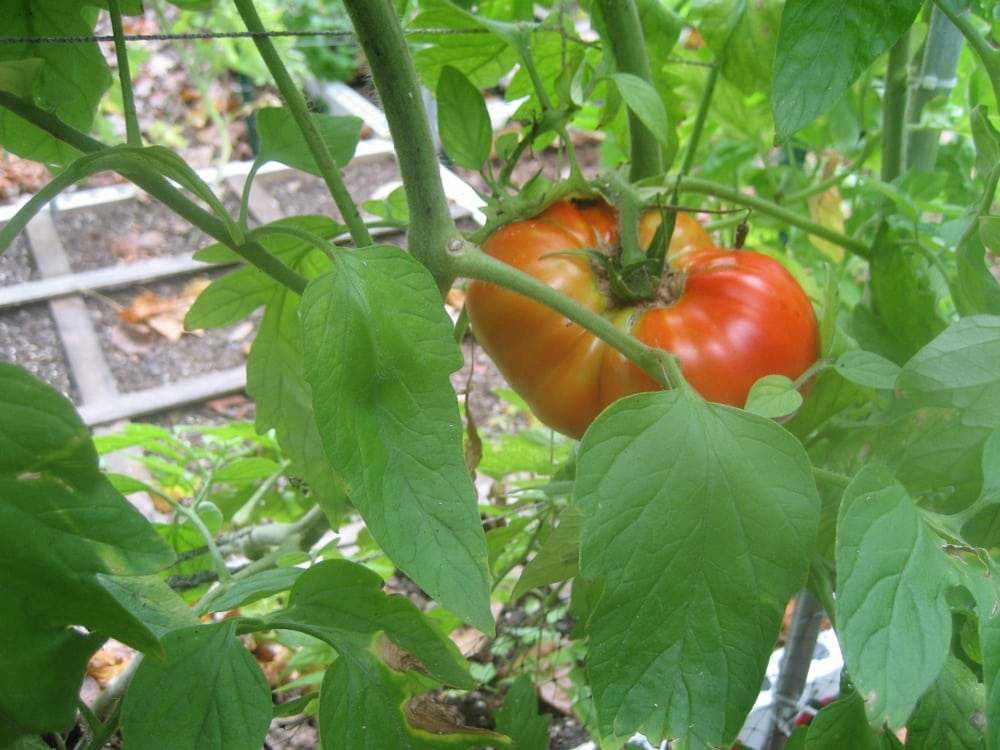
Now, it’s time for the most fun part of all: gathering your fully ripe Beefmaster tomatoes! As mentioned, this variety is classified as an indeterminate tomato. This means it will continue to produce fruit over a long period of time, so it’s important to check your crop on a daily basis.
Some gardeners prefer to pick their Beefmasters while they’re still green and allow them to ripen indoors. This is a great tactic to try if you’re worried that yours might fall victim to pests, rot, or disease. Otherwise, look for a bright red tomato that feels firm to the touch.
Rather than yanking it off the stem, carefully grab the tomato and twist it at the top until it releases from its parent stem. If you use a pair of pruners, then cut the stems as close to the fruit as possible.
Frequently Asked Questions
Are you still wondering how to best care for your Beefmaster tomato plants? Here are the answers to some of the most commonly asked questions about this topic.
Answer: It’s best to store your tomatoes in a cool, dark spot inside your house. Don’t put them in the refrigerator as soon as you bring them inside, because the cold temperatures can shock the fruit, which causes the flavor compounds to break down. If you’ve ever eaten a cold, mealy tomato and wondered what happened, now you know!
If you have a shady spot outside of your home, your tomatoes will also store well there.
Answer: Being an F1 hybrid plant, Beefmasters are more pest-resistant than some other varieties. However, that doesn’t mean that they’ll spend a glorious summer completely pest-free. A few of the most common, unwelcome intruders include:
• Flea beetles
• Cutworms
• Hornworms
Flea beetles are so named because they’re as tiny as fleas and can jump. If you notice small holes all over your plant foliage, then adult flea beetles are most likely to blame. These pests can also feed on the roots of your plants and cause damage there. You can catch them with yellow sticky traps, but you may want to use row covers to protect your youngest, most vulnerable plants.
Cutworms, on the other hand, are immature caterpillars that look similar to grubs. They can munch up an entire seedling overnight, so it’s important to take precautions against them. Using paper or cardboard, create a collar around the stem of your plant to prevent them from attacking.
Finally, hornworms are larger and much more prevalent than cutworms. These are notorious tomato plant pests that also feed on the developing leaves and fruit. Though they’re hard to find because they’re green, you can simply pluck them away as you find them. You can also use an organic treatment called Bacillus thuringiensis (BT) to remove them.
Answer: Hybrid Beefmasters have undergone significant improvements lately. Their flesh is mildly sweet and pleasant to eat. Huge and deep red, these look like a classic, quintessential tomato and work well in any dish that calls for them.
In addition, this specific variety is also delicious when canned! You can make delicious spaghetti sauce for tomato sauce from scratch using a recipe like this one. Thanks to its vibrant flavor, this type of tomato is incredible in fresh salsa.
Answer: Beefmaster tomatoes are a specific variety of beefsteak tomatoes. This means that “beefsteak” is the higher, more overarching category while Beefmasters fit beneath that umbrella. If you find a recipe that calls for the latter, then you can absolutely use an F1 hybrid Beefmaster tomato to create a delicious dish.
Other types of beefsteak tomatoes to try include:
• Brandywines
• Cherokee Purples
• Black Krim
• Big Beef
In general, beefsteaks tend to be very juicy and large. They’re also meaty and produce a ton of fruit. For this reason, they’re a go-to choice for chefs, both at home and in restaurants.
Answer: It can be disheartening to check on your tomato plants only to find that they’re not growing like you thought they would. If yours are still on the smaller side, they’re likely stressed.
Just like humans, plants can get stressed out when their current conditions aren’t going well. A few issues that might be going on include:
• Extreme heat or drought
• Disease
• Pest infestation
• Too much fertilizer or nitrogen
• Too much shade
To survive under these conditions, the tomato plant will temporarily stop spending its energy on flower or fruit production. Instead, it will focus on sustaining its roots. This means that even if your plant looks like it’s dying, its root system might be just fine.
Grow Your Own Beefmaster Tomatoes at Home
You don’t have to travel into town to sink your teeth into the best BLT around. Nothing beats the vibrancy of a fresh tomato, and Beefmaster tomatoes are some of the best you can grow.
With this Beefmaster Growing Guide, you’re all set with the information you need to get started. Before too long, you’ll be harvesting your crop and planning a repeat garden for next year! If you’re looking for more gardening advice, feel free to check our blog often for relevant insights and timely updates.